Whisper

Thursday, August 14, 2014

What was I thinking?

Quite some time ago I was looking at our local Facebook for sale site and saw a photo of a dining table, 6 chairs, and buffet. All disassembled but a very good price. It looked interesting so I got my sister in law to ride over to a town about an hour from where I live to check out this great buy. Well, this set had been stored in a garage for many years but I thought it had potential. There I go again.... potential.... that sometimes gets me into trouble. LOL

Of course I bought the set, somehow squeezed all of that into the back of the truck, and brought it home to store in my basement. After about 6 months, I decided to redo the table. Here's what I started with:

Well I think you can see that this set of table and chairs definitely needed some work. So I stripped, sanded, stained, and used polyurethane on the table top and painted the bottom. The chairs had to be glued back together and then reupholstered. I had a tough time getting the oil based polyurethane to dry. In fact, it never did dry. At this part I began to question my sanity. Why, oh why did I ever buy this??? I let it sit for 4 days hoping it would dry. Nope, never did. I finally sanded down the tabletop again, being careful not to take off the stain; and then used polycrylic on the top. Here's the finished product:

I am happy with the finished product. I took it into Restoration Emporium in Kansas City where I sell my items. I was hoping this would sell as a set, but no such luck. Only 4 out of the 6 chairs sold, to a nice couple. Then the table sold to another couple.

Thursday, July 17, 2014

Remodeling a Small Powder Room

Over the past several months we've been remodeling a small powder room off of our family room. It all got started when I was just so tired of having white carpeting throughout the house. We had lived with that same carpet for 21 years, I figured it was time for a change; even though hubby did not. Lucky me, my cousin married a man that owns a hardwood floor company! So, I was able to have him and his crew come install some beautiful floors in our house.

I decided it would be appropriate to share this remodel here on the blog because it goes along with my theme of reuse and repurpose. I did manage to take just a couple shots of the bathroom before the big changes. Here you go.....

You can see that the hardwood floor has already been installed and I'm just getting ready to strip that lovely wallpaper.

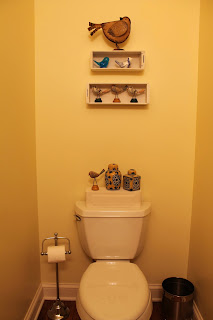
I painted the walls a lovely yellow color, used a very old dresser as a vanity, and used accessories that were purchased at estate and garage sales, or I already had around the house.

Welcome to the bathroom, here's the view as you are coming in the door. Kind of a modernistic painting for a more traditional bathroom, but I like to mix styles .... and I painted this myself several years back. It just seems to fit here, I love the colors! That's the beauty in painting your own stuff, you can make it whatever colors you please!

I really like the way the old dresser fit almost perfectly into the bathroom. There's quite a story behind this dresser, but I'll try to be brief. The dresser was advertised on a local online For Sale site; I went to see it and boy was it in rough shape. It was in pieces and filthy. Well, I bought it anyway because I could see the beauty in it, and it was a good price. I brought it home, cleaned it up and put it back together. I then painted the bottom portion and redid the top, leaving it wood grain. I took it into the store where I was selling vintage items. I put what I thought was a reasonable price on it. And it sat there without selling. I moved to another store, same story. Oh, people stopped and asked questions about the dresser, and admired it but nobody would buy it. Meanwhile, back at my own house, I was starting the bathroom remodel. It hit me.... that dresser was just waiting for ME to give it a home! So I did. I repainted it, keeping the top natural wood, hired a carpenter to adapt it so that the plumbing would fit behind. And VOILA.... I love it! Oh, the vessel sink is from Overstock.com and my husband thinks it's just the weirdest thing, as he can't imagine why anybody would want a #1 - patterned sink, and #2 - a sink that sits on TOP of the vanity. Oh well, he's a man, I don't need to say more. The mirror I already had hanging elsewhere in the house and I just painted the frame and hung it here. The light fixture above the mirror is the same one I had but I took it down, painted it too, and hung it back up turning it upright where before it pointed down.

I sure had fun with the accessories in the bathroom. The little white cabinet with the drawers hanging to the left of the sink was purchased at an estate sale. The lady said it was hand made by her grandfather or great grandfather. It was in the kitchen at the estate sale and it was a very primitive looking spice rack. I painted it as the color of the wood was too orange for my liking. I painted some old sewing drawers white too and hung them behind the toilet for display. Some of the birds I'm using as décor I had been given as gifts, other I either bought on sale or used.

Well, thanks for taking the time to read through (or maybe just look at the pictures) in this lengthy post. Come back and visit me again!

Thursday, June 26, 2014

Being Resourceful

Recently, at a garage sale, I spied a white shabby table far back on the edge of the driveway at the sale. I had to ask the owner if the table was for sale as there were many sale items sitting on it. He told me, "yes." So of course, I asked, "how much." I was surprised when he said, "$1." I took it of course!

When I got the table home, I thought that it would be a nice size for a little picnic if the table had some benches to go with it. So, being resourceful, I decided to build a couple of benches. Had I EVER built benches before???? Nope. But I had been looking at some Ana White building plans, and I did know how to use a saw, a drill, and a hammer. Obviously, I could pull off some simple benches.... or at least I was hoping that I could. After writing down some directions off Ana's web site (our printer isn't compatible with my new computer - yep, another story), I took a trip to the local lumber yard, where I bought the boards for 2 benches and some extra boards just in case I happened to ruin a few.

Here's the result:

I was pretty pleased with the first bench, but I could see that this bench was too large for the small table. So I changed some dimensions and built two more benches. Here they are:

I decided the benches needed to be stained, then painted, then distressed. Well, I couldn't get the white ones as distressed as the table as you'll see in the picture. But I LOVE the look of the worn table so I'm not changing that.

I've decided that building stuff is a lot of fun and that I'd really like to do some more building.... I have another project in mind already. You'll just have to wait and see if I get it done. I'll post pictures if I do.

Saturday, June 14, 2014

A Different Use for a Coffee Bean Sack

Last summer some friends and I traveled to Texas for a huge flea market that is put on monthly. It's called First Monday Trade Days in Canton, TX. I did a blog post on it. On that trip, I purchased quite a few burlap bags. I've used almost all of them so I guess I'll need to take another long drive to Canton. LOL Here's what I did with one of the coffee bean sacks.

I started with this chair:

Then I added the linen upholstery fabric to the seat portion and the coffee bean sack to the seat back. The back side of two coffee bean sacks was needed to cover the back of the chair.

The chair is now for sale at Restoration Emporium in Kansas City MO.

Friday, May 23, 2014

How is a Hutch Like a Bowling Pin????

Well, it's been a while since I've posted last. I teach school full time and the end of the year is CRAZY! So, I just officially checked out for the summer. I'll need to come back to school and sort lab equipment and get stuff put away but I now have more freedom to do that on my own time frame.

Today I want to share a few pictures of a hutch that I redid. Here's what I started with:

This is a nice piece of maple furniture. Very sturdy, it just has some blemishes. According to what is inside the drawers, this is made of the same kind of wood they use for bowling pins???

I painted the bulk of the dresser French Linen, then applied a stencil procedure to the top.

Here's the whole thing finished and in the shop.

Saturday, March 29, 2014

The Farm Table

I saw this great round table advertised on a local for sale site but the table was located in a town about a 45 minute drive from where I live. I decided to go ahead and go get it. When I got to the location I immediately knew I wanted that round table but I also saw a larger rectangular table that was disassembled sitting in the corner. Of course I asked about that table too. She said that she would sell it to me. Horray! Two tables on one tank of gas is even better.

Here's a picture of the table once I put it back together:

I first stripped the top and painted the legs black. I really liked the wood in it's natural state, so to finish it I just used Miss Mustard Seed's Hemp Oil. I just love that stuff! Oh, sorry that you can see all the junk in my garage. We've been remodeling our powder room, that's why there is now a toilet being stored in the garage. Once the powder room is complete I'll have to post a few pictures of that. I'm using an antique chest for the vanity. I'm hopeful it'll turn out lovely. Today is the day to strip the old flowered green wallpaper off the walls..... Oops, I'm getting off topic here. Back to the table...

Here's the table all finished and set up in my booth. The china on the table is (of course) vintage, it's a heavy duty Air Force china set.

Oh, that round table I mentioned earlier in this post? I actually did a blog post about that table this past summer. I painted it gray.

Friday, March 28, 2014

It's A Looker

About a year ago my sister, brother-in-law and I went antique shopping. WAAAAYYYY in the back of a store there was an old record cabinet in terrible shape. The veneer was peeling and it was all dusty and covered with spider webs. I saw some great lines and the inexpensive price tag and decided it'd had to go home with me. My brother-in-law was kind enough to carry it out to the car for me. Both he and my sister thought that surely I was half crazy for wanting that old record cabinet that was in such poor shape. Well, the cabinet sat in my basement for a little more than a year before I decided to give it a redo.

Here's the before and after, both inside and outside: